
From zero to WordPress in less than 2 minutes on Linode using cloud-init and/or Terraform
Yeah, it’s true. You can get a fully running VM with installed MySQL, Apache, PHP and WordPress configured in less than 2 minutes! 1:58 to be exact 🙂
Ok, what is cloud-init in the first place?
Cloud-init is a widely used open-source package for initializing and configuring cloud instances (virtual machines or instances) in cloud computing environments. It is commonly used in infrastructure as a service (IaaS) and cloud platforms such as Akamai Connected Cloud, Amazon Web Services (AWS), Google Cloud Platform (GCP), Microsoft Azure, and various other cloud providers.
Cloud-init allows you to define and execute custom scripts and configuration at instance launch time or when an instance boots. It is typically provided with the cloud instance’s metadata during its provisioning. This metadata can include user data, which consists of cloud-init configuration in the form of a script or YAML file.
Key features and use cases of cloud-init include:
Operating System Configuration: You can use cloud-init to perform various tasks like setting the hostname, configuring network interfaces, setting up users, and more.
Package Installation: Cloud-init can be used to install software packages, libraries, or applications on the newly provisioned instance.
User Data: You can pass user-specific data to the instance, which can be used to customize the instance’s behavior at boot time. For example, you can use it to configure software, install additional packages, or run scripts.
Security: You can use cloud-init to set up SSH keys for secure access, set firewall rules, or perform other security-related tasks.
Customization: Cloud-init allows you to define instance-specific customizations, making it easier to automate the setup and configuration of instances.
Cloud Provider Agnostic: While commonly used in various cloud providers, cloud-init is not tied to a specific cloud platform. It’s available and can be used in many different environments.
Flexibility: You can provide cloud-init configuration as a script or a YAML file, giving you flexibility in how you define the initialization and configuration process.
Ok, but how do I use it? It’s quite simple actually.
In this example, we install 5 packages and run a few commands to download WordPress, create a DB user, prepare wp-config file and so on.
Please make sure to use a better password and/or a better way to deliver the credentials to the VM. Password in plain text is just for demo purposes and it’s just plain wrong (ha ha, get it! :D)!
Log into your Linode Cloud manager interface and click on “Create Linode” button.
Make sure to select a distribution which support cloud-init! Those are indicated by a “file” icon next to the distro name.
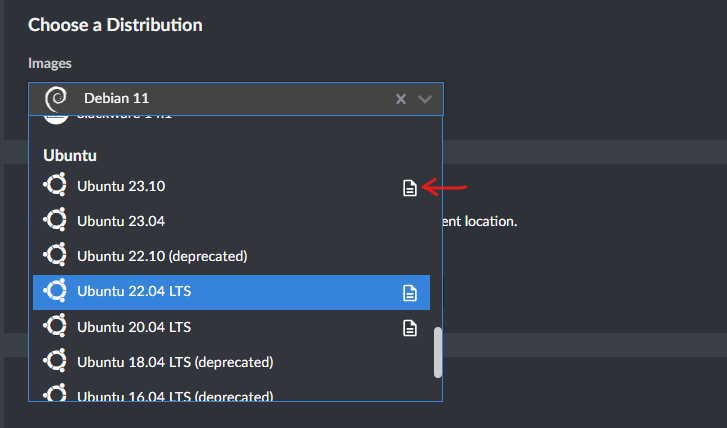
Next step (beside selecting the region, instance type, key and password), is to expand the “User Data” section and paste in the following code and press “Deploy”.
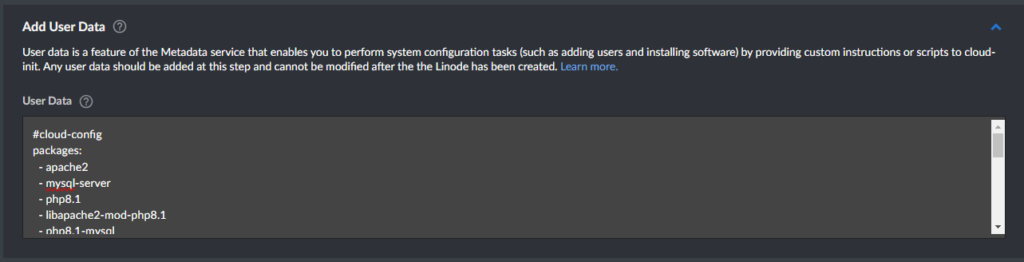
#cloud-config
packages:
  - apache2
  - mysql-server
  - php8.1
  - libapache2-mod-php8.1
  - php8.1-mysql
runcmd:
  - mkdir -p /var/www/html  # Create the /var/www/html directory if it doesn't exist
  - rm -f /var/www/html/index.html  # Remove the default index.html file
  - [wget, https://wordpress.org/latest.tar.gz, -O, /tmp/wordpress.tar.gz]
  - [tar, -xvzf, /tmp/wordpress.tar.gz, -C, /var/www/html]
  - mv /var/www/html/wordpress/* /var/www/html/  # Move WordPress files to the root of the web directory
  - [chown, -R, www-data:www-data, /var/www/html]
  - |
    mysql -u root -e "CREATE DATABASE wordpress;"
    mysql -u root -e "CREATE USER 'wordpressuser'@'localhost' IDENTIFIED BY 'ComplexPassword123#';"
    mysql -u root -e "GRANT ALL PRIVILEGES ON wordpress.* TO 'wordpressuser'@'localhost';"
    mysql -u root -e "FLUSH PRIVILEGES;"
  - cp /var/www/html/wp-config-sample.php /var/www/html/wp-config.php
  - sed -i 's/database_name_here/wordpress/g' /var/www/html/wp-config.php
  - sed -i 's/username_here/wordpressuser/g' /var/www/html/wp-config.php
  - sed -i 's/password_here/ComplexPassword123#/g' /var/www/html/wp-config.php
  - a2enmod php8.1  # Enable PHP module
  - systemctl restart apache2  # Restart Apache to apply the changes
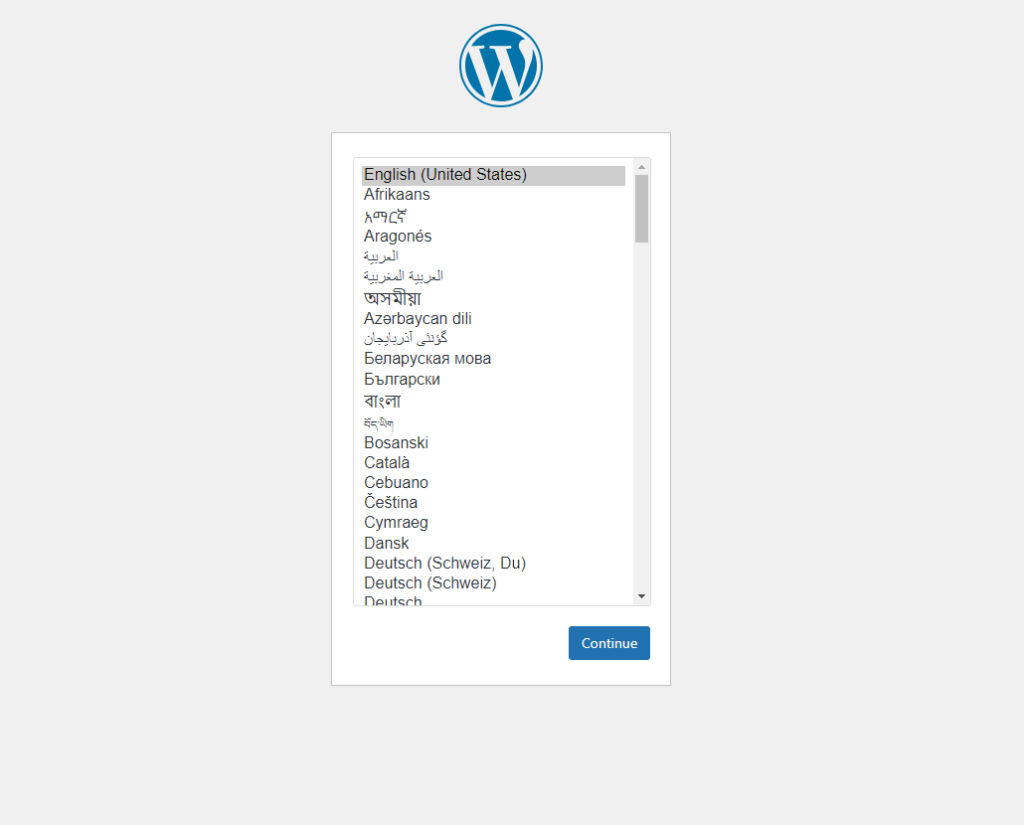
Open your browser and navigate to the IP address of the server and less than 2 minutes after you should be greeted with a WordPress “Finish setup” page where you need to specify your email, username and password.
You can accomplish the same thing via Terraform by using the “metadata” block and encoding your cloud-init script in base64.
resource "linode_instance" "wordpressviacloudinit" {
  label = "Wordpress-via-cloudinit"
  image = "linode/ubuntu22.04"
  region = "us-iad"
  type = "g6-standard-1"
  authorized_keys = ["ssh-rsa AAAA...Gw== user@example.local"]
  root_pass = "terr4form-test"
  metadata {
    user_data = "I2Nsb3VkLWNvbmZpZwpwYWNrYWdlczoKICAtIGFwYWNoZTIKICAtIG15c3FsLXNlcnZlcgogIC0gcGhwOC4xCiAgLSBsaWJhcGFjaGUyLW1vZC1waHA4LjEKICAtIHBocDguMS1teXNxbApydW5jbWQ6CiAgLSBta2RpciAtcCAvdmFyL3d3dy9odG1sICAjIENyZWF0ZSB0aGUgL3Zhci93d3cvaHRtbCBkaXJlY3RvcnkgaWYgaXQgZG9lc24ndCBleGlzdAogIC0gcm0gLWYgL3Zhci93d3cvaHRtbC9pbmRleC5odG1sICAjIFJlbW92ZSB0aGUgZGVmYXVsdCBpbmRleC5odG1sIGZpbGUKICAtIFt3Z2V0LCBodHRwczovL3dvcmRwcmVzcy5vcmcvbGF0ZXN0LnRhci5neiwgLU8sIC90bXAvd29yZHByZXNzLnRhci5nel0KICAtIFt0YXIsIC14dnpmLCAvdG1wL3dvcmRwcmVzcy50YXIuZ3osIC1DLCAvdmFyL3d3dy9odG1sXQogIC0gbXYgL3Zhci93d3cvaHRtbC93b3JkcHJlc3MvKiAvdmFyL3d3dy9odG1sLyAgIyBNb3ZlIFdvcmRQcmVzcyBmaWxlcyB0byB0aGUgcm9vdCBvZiB0aGUgd2ViIGRpcmVjdG9yeQogIC0gW2Nob3duLCAtUiwgd3d3LWRhdGE6d3d3LWRhdGEsIC92YXIvd3d3L2h0bWxdCiAgLSB8CiAgICBteXNxbCAtdSByb290IC1lICJDUkVBVEUgREFUQUJBU0Ugd29yZHByZXNzOyIKICAgIG15c3FsIC11IHJvb3QgLWUgIkNSRUFURSBVU0VSICd3b3JkcHJlc3N1c2VyJ0AnbG9jYWxob3N0JyBJREVOVElGSUVEIEJZICdDb21wbGV4UGFzc3dvcmQxMjMjJzsiCiAgICBteXNxbCAtdSByb290IC1lICJHUkFOVCBBTEwgUFJJVklMRUdFUyBPTiB3b3JkcHJlc3MuKiBUTyAnd29yZHByZXNzdXNlcidAJ2xvY2FsaG9zdCc7IgogICAgbXlzcWwgLXUgcm9vdCAtZSAiRkxVU0ggUFJJVklMRUdFUzsiCiAgLSBjcCAvdmFyL3d3dy9odG1sL3dwLWNvbmZpZy1zYW1wbGUucGhwIC92YXIvd3d3L2h0bWwvd3AtY29uZmlnLnBocAogIC0gc2VkIC1pICdzL2RhdGFiYXNlX25hbWVfaGVyZS93b3JkcHJlc3MvZycgL3Zhci93d3cvaHRtbC93cC1jb25maWcucGhwCiAgLSBzZWQgLWkgJ3MvdXNlcm5hbWVfaGVyZS93b3JkcHJlc3N1c2VyL2cnIC92YXIvd3d3L2h0bWwvd3AtY29uZmlnLnBocAogIC0gc2VkIC1pICdzL3Bhc3N3b3JkX2hlcmUvQ29tcGxleFBhc3N3b3JkMTIzIy9nJyAvdmFyL3d3dy9odG1sL3dwLWNvbmZpZy5waHAKICAtIGEyZW5tb2QgcGhwOC4xICAjIEVuYWJsZSBQSFAgbW9kdWxlCiAgLSBzeXN0ZW1jdGwgcmVzdGFydCBhcGFjaGUyICAjIFJlc3RhcnQgQXBhY2hlIHRvIGFwcGx5IHRoZSBjaGFuZ2VzCg=="
  }
  group = "foo"
  tags = [ "foo" ]
  swap_size = 512
  private_ip = false
}
Of course, you can use cloud-init for pretty much anything you want but the ideal usecase would be bootstrapping your instance so your configuration management tool can take over after Terraform creates it.
Until next time!
Cheers, Alex.